Django is a popular Python-based web framework that allows developers to create scalable and dynamic web applications quickly and efficiently. Once you’ve developed your Django application, the next step is to deploy it to a production server so that it can be accessed by users. Deploying a Django app can be daunting, especially if you’re new to web development or server administration. However, with the right guidance and tools, it can be a smooth and straightforward process. In this guide, we will walk you through the steps required to deploy a Django application on Cpanel, including configuring the server environment, setting up a database, and deploying the app using the popular deployment option; Cpanel. By the end of this guide, you should have a working Django app running on a production server and ready for use by your users.
Note: You can scroll to the bottom and watch the video tutorial of this guide.
Requirements to deploy a Django application:
- Access to Cpanel and a registered domain name
- Compressed Django files in a zip format.
- A requirements.txt file in your Django files (not a must, but highly recommended)
- Shell access on Cpanel
Quick Overview
- Create a Python app on Cpanel
- Upload your website files
- Install your project dependencies
- Debugging and finalizing the setup
How to Create a python app on Cpanel
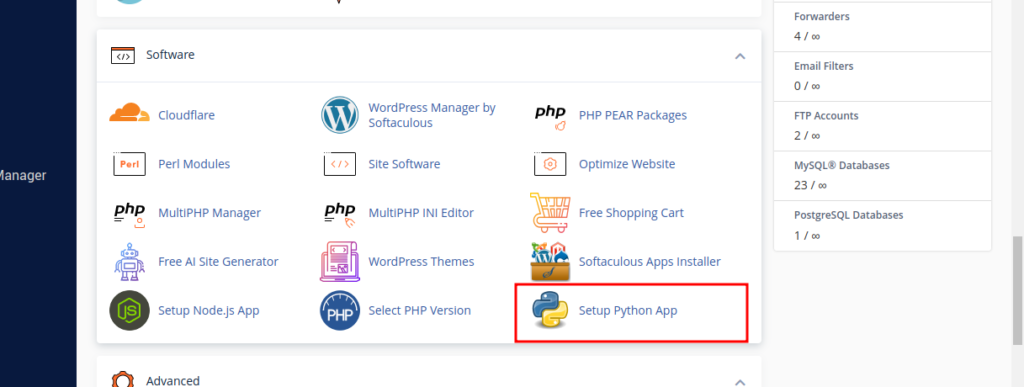
Access your Cpanel and search for the setup Python App option. This option can be selected under the software section on the Cpanel homepage

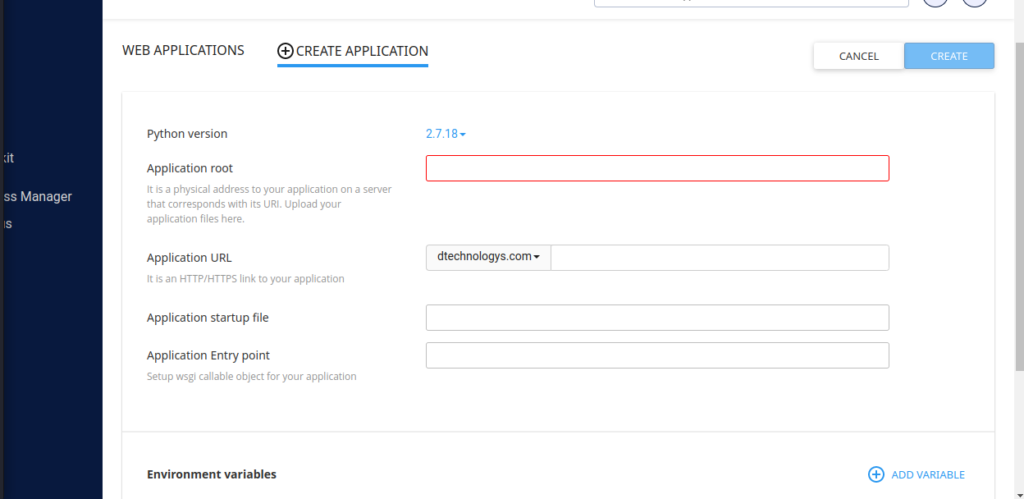
On the setup Python app page, click the Create Application button and fill in the necessary details.

Important details to set up
- Python Version: Select the preferred Python version. For better performance, select Python version 3 and above.
- Application root: This is the location where you will upload your files. It is a common practice to use the domain name for this folder, but there are no restrictions. Enter your preferred folder location.
- Application URL: Select the domain or subdomain on which you wish to install the application on. If you wish to be accessing your home page on yourdomain.com/api, ensure to add the API bit in the editable field.
- Application startup file and Application Entry point: Leave these 2 fields blank. They will be filled out automatically once the application is created.
- Environment Variables: If you have defined your environment variables, you can add them to this section. If you have none, this section can be left as it is.
Once the application has been created, try accessing your domain or subdomain and you should get a success message, such as the one below.
It works!

Python 3.8.12
If you get an error such as 503, create the application again, and select a different Python version.
How to upload website files
Navigate to the file manager under the application root defined when creating the Python application, upload the compressed files of your web application, and extract. The way to upload the files is the same way you upload static website files; see the reference guide: Upload a Website
How to install Python app dependencies
Back to the Python application dashboard, copy the virtual environment, open the terminal, and paste the URL. The terminal can be accessed under the Advanced tab on the Cpanel home page

On the terminal, we will run a set of commands, see them below.
pip install --upgrade pip     #To upgrade the version of pip
pip install -r requirements.txt    #To install python dependancies
python manage.py collectstatic    #collect static files
python manage.py createsuperuser   #create a database superuser  (optional)
python manage.py runserver         #start the development server. In case there are errors, they will show up here
Debugging and finalizing the Django app setup
Once the dependencies have been installed successfully, navigate to the file manager, under the application root of your application, locate a file named passenger_wsgi.py, edit, remove the current content, add the following, and save:
from projectfolder.wsgi import application #projectfolder is the folder with settings.py, wsgi.py and related folders. Navigate to the project folder, and edit the settings.py. Edit the ALLOWED_HOSTS to read as shown below:
ALLOWED_HOSTS = ['yourdomain.com','www.yourdomain.com'] #replace yourdomain.com with a real domain name or a subdomain. If you have another host to add, eg a host to external database, add it here and save changes. At this stage, our application is ready to run. Navigate back to the Python application dashboard and restart your application. Access your domain name. If your domain is accessible, edit the settings.py and set DEBUG=False, otherwise continue to troubleshoot the errors.
Common errors during deployment
- Error 500: You could be missing some dependencies or bugs in your code. Set DEBUG=True in the settings.py file so that errors are displayed instead of the error 500. Also, access the terminal and paste the environment path, and run python manage.py runserver to show some real-time logs
- Error 503: Recreate the Python app and select a different Python version. If all versions throw the same error, contact your hosting provider.
- Static and media files not loading: Refer to the official documentation on how to set up static and media files.
Video on how to deploy a Django web application on Cpanel
Need help deploying your Django application? Get in touch with us: Dynamic Technologies
Was the guide helpful? Share this with others. In case of any challenges or errors, please write a comment in the comment section or contact us.
Web Hosting and email hosting Packages
Related content
- A Practical Tutorial for Dockerizing Software Applications
- How to Configure a Docker App to a Domain Name
- Getting Started with Docker | Docker commands
- How To Run Scripts in Linux
- Deploy a Django Application on EC2 Instance with Nginx
- How to configure a domain to a docker container and install an SSL certificate on AWS


