The world is quickly changing, and online businesses are taking over. People will first shop online before making their way to your physical shop. Building and maintaining an e-commerce shop can be expensive, but the emergence of some drag-and-drop web builders, and ready-made shops has made it possible to cut short the budget of coming up with an e-commerce shop. There are a variety of such platforms you can choose and come up with a shop without having any coding skills or experience. All that is needed is to have the information about your shop, and with a few clicks, you have an online shop, ready to start selling! This article highlights, how to install Prestashop, Prestashop requirements, and common errors in Prestashop installation. See below an example of e-commerce website builders:
12 popular e-commerce website builders
- https://olitt.com
- Shopify
- https://www.prestashop.com/en
- 3dcart
- Weebly
- Squarespace
- BigCommerce
- Wix
- WooCommerce
- Volusion
- Zyro
- Selz
In this guide, we will review how to set up PrestaShop in a few minutes and have your shop online.
Prestashop Requirements
To install Prestashop, you will need a domain name and hosting. Also, ensure that the following server requirements are met.
- PHP extensions:
>> PHP 7.1 or later, but not above version PHP 7.4. (At the time this article was published)
>> Ensure the following PHP versions are enabled: gd, cURL, zlib, SimpleXML, SOAP, OpenSSL, PDO, Mbstring, Mcrypt, PHP’s OPcache extension
>> Other PHP settings: memory_limit set to at least 128MB, max_execution_time set to at least 180 - Database:
>> MySQL 5.0 or later (recommended) or MariaDB
>> Access to create a new database
>> InnoDB storage engine enabled - Ensure that the domain is accessible online, the server has enough space in terms of disk usage and inode usage, and has SSL installed.
How to install PrestaShop on Cpanel
There are 2 methods of installing PrestaShop on your Cpanel.
Method 1: How to install PrestaShop from the softaculous app installer
- Login to your Cpanel. Under the software group, click on the softaculous app installer.
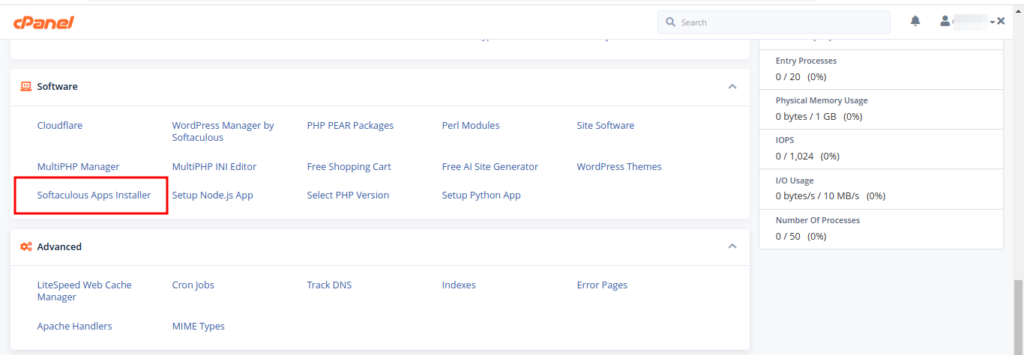
2. On your top left search field, search for Prestashop, click on this option, then click on Install Button.

3. Select the domain you wish to install Prestashop on, and set other administrative information. Ensure to note down the information filled in here as it will be required in the future. Once done, click on install
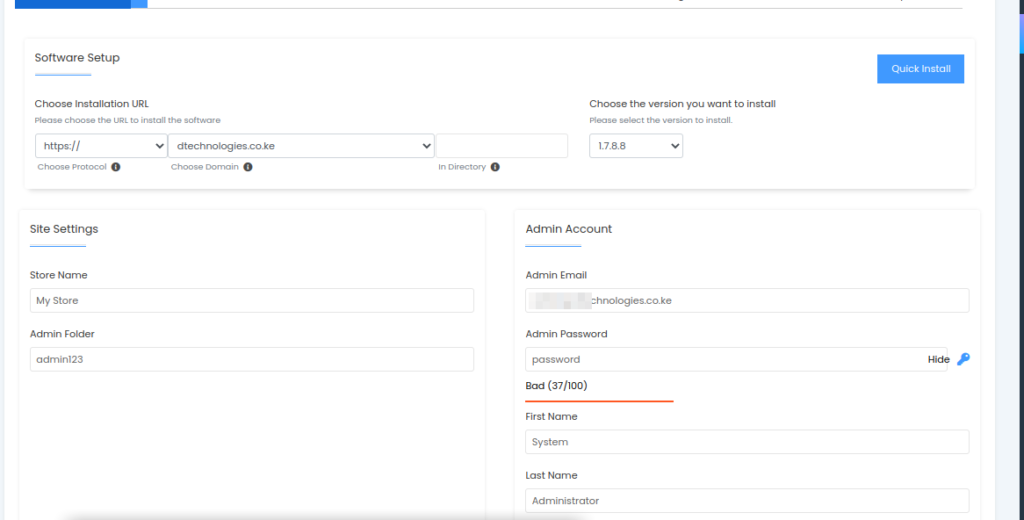
The installation may take up to 5 minutes to complete. Once done, you can now access the admin dashboard, and customize and upload your products.
How to access the Prestashop admin dashboard
There are currently 2 ways of accessing your admin dashboard:
- Upon installation of Prestashop, an admin URL will be generated. Use the URL and the information you used when doing the installation.
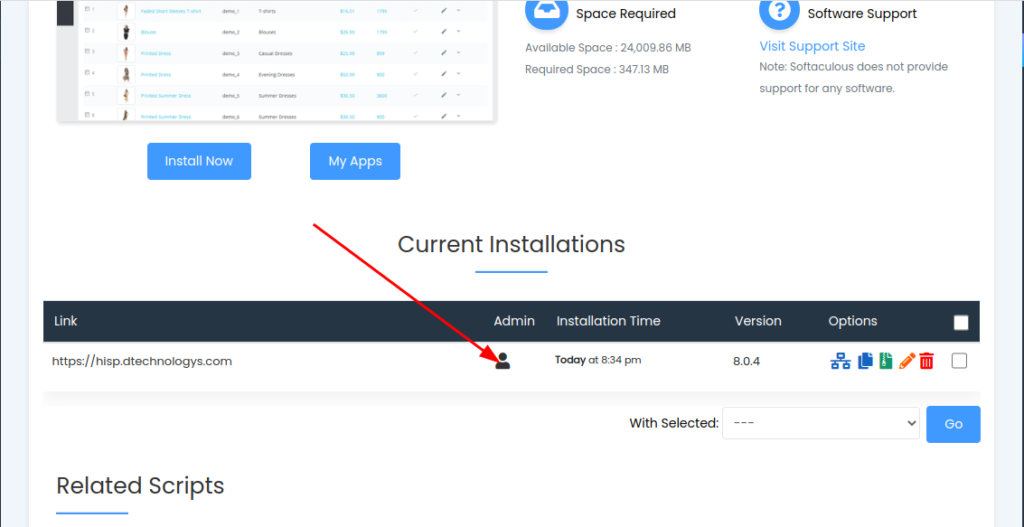
- From your Cpanel; access the softaculous app installer > search for Prestashop; under current installation, click on the user icon to log in.
Common errors when installing Prestashop
- During Prestashop installation, the following error may happen.
Unable to generate new_cookie_key, hence can not install Prestasho….. This is a system error or an error related to the version you wish to install. To resolve this, try installing an older version or install Prestashop manually as illustrated on method 2 below. - Error 500. The error is mostly caused by the wrong PHP version. As of the time of writing this article, Prestashop requires PHP version 7.4 or later versions. Adjust the PHP version to resolve this error. See the reference guide on how to change PHP version in Cpanel
Method 2: How to install PrestaShop manually
- Visit Prestashop’s official website download page at download Prestashop , fill in your details, and select continue to download.
- Once the download is complete, upload the downloaded file to the root folder of your domain or subdomain. The method to upload the file is similar to that of uploading a static website. See how to upload a static website on Cpanel here
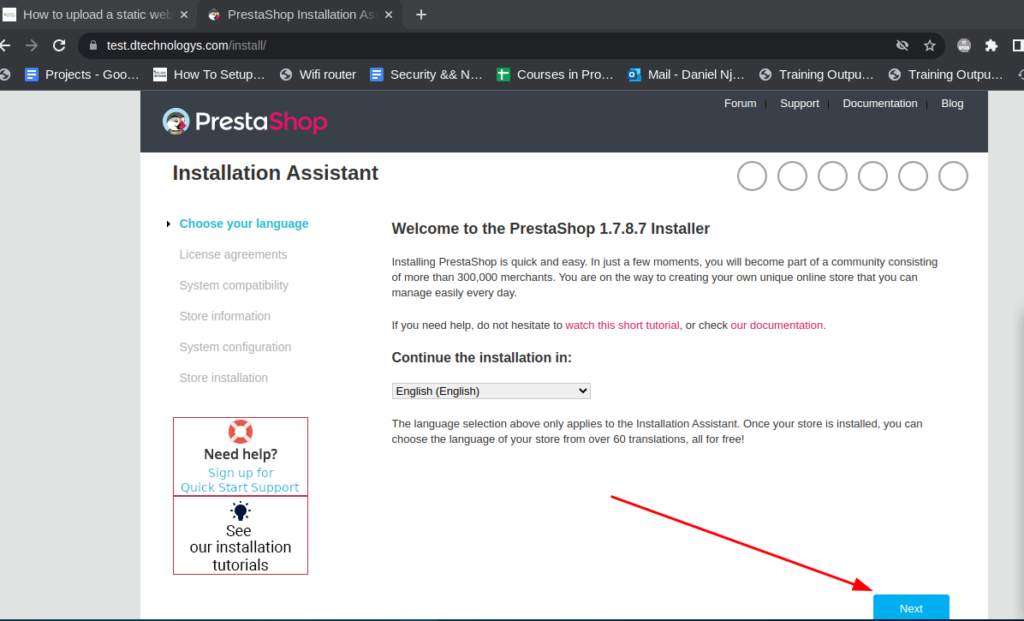
- Extract the uploaded file. Once done, initiate the installation process by accessing the installation domain or subdomain, select the language if different from the default, and click on “Next”.
4. Agree on the terms and conditions and proceed.
5. Fill in the information as required:
Information about your Prestashop Store
- Shop Name: Enter your preferred shop name
- Main activity: Click on the drop-down and select the category for your website.
- Install demonstration data: Select Yes or No
- Country: Select your county from the drop-down
- Shop timezone: Select your preferred timezone
- Enable ssl: Select Yes to reinforce ssl on your domain.
Your Account
Fill in the details as required. Proceed to the next stage.
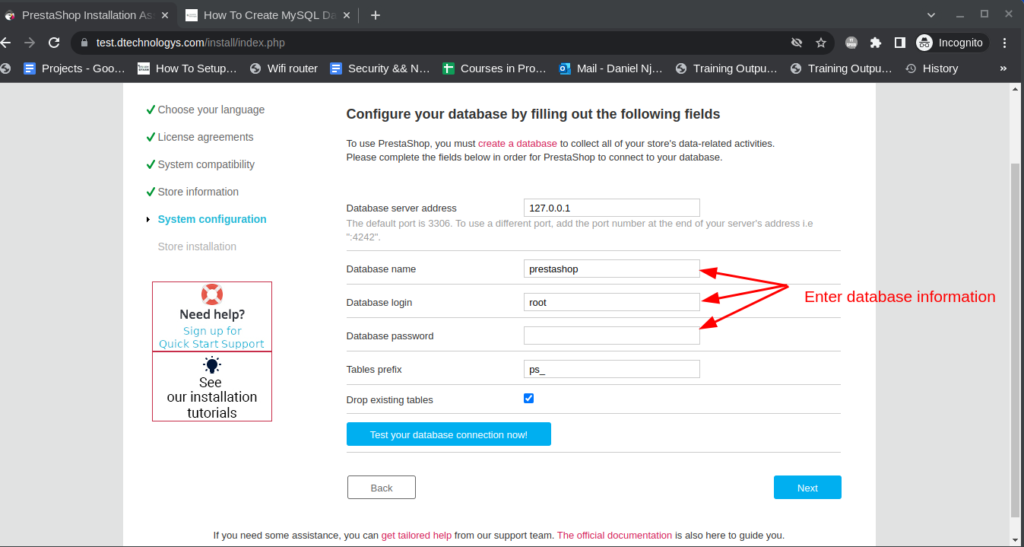
6. The next stage requires that a database and a database user be created. Create a MySQL database and record the records. See the reference guide on how to create MySQL database on Cpanel. Fill in the database details and click “Next” to complete the installation.
7. Once completed, copy or take note of the email and the password as this will be needed to access the admin dashboard. Navigate to file manager and delete the folder named install:-for security purposes.
8. To access the admin dashboard; type in https://yourdomain/admin. While this is the default admin dashboard URL, this may automatically change for security reasons. If the link returns an error 404, navigate to the root folder of the domain and check on the name of the admin folder; usually, some characters will be added to this folder. Note this name and replace it on the URL. This will be your default admin URL.
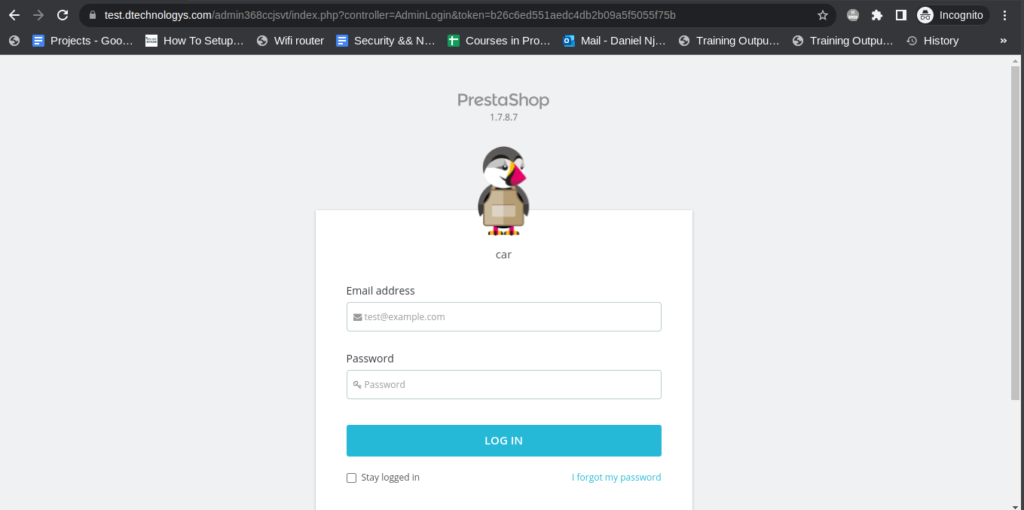
Access the admin dashboard and proceed to customize your shop.
Web Hosting and email hosting Packages
Related content:
- A Practical Tutorial for Dockerizing Software Applications
- How to Configure a Docker App to a Domain Name
- Getting Started with Docker | Docker commands
- How To Run Scripts in Linux
- Deploy a Django Application on EC2 Instance with Nginx
- How to configure a domain to a docker container and install an SSL certificate on AWS

