In this comprehensive guide, we’ll walk you through the essential steps on how to push a project to GitHub. Our step-by-step instructions will help you seamlessly integrate your project with GitHub. Learn the fundamentals, from initializing a Git repository to mastering the art of pushing changes to the cloud. Dive into the world of collaborative coding and discover the power of GitHub in our easy-to-follow tutorial.
What is GitHub?
GitHub is a web-based platform that facilitates collaborative software development using Git. It serves as a central hub for version control, enabling teams to track changes, manage projects, and work on code together.
Prerequisites
Before diving into GitHub, ensure you have the following:
- A GitHub account. Create an account here: GitHub
- Git installed on your local machine.
- Code that needs to be pushed to Git Hub on your local machine/a cloud server.
1. Create a repository
Log in to your GitHub account, and click on “New” button.

In the Create a new repository page, there are a number of fields to fill in. While some are required, we have some optional fields.
1.1 Fields in creating a repository
- Repository Template:
- GitHub allows you to use a template for your repository, providing a starting point for projects with a particular structure or features.
- Templates can be useful for standardizing project layouts or including files like a README or license.
- Repository Name:
- This is the name of your repository on GitHub.
- Choose a name that is descriptive, concise, and relevant to your project.
- Description:
- The description provides a brief overview of your project.
- It helps others understand the purpose and scope of your repository.
- Category: Public or Private:
- Choose whether your repository will be public or private.
- Public repositories are visible to anyone, while private repositories require access permissions.
- Initialize This Repository with README File and/or .gitignore:
- Initializing with a README creates an initial README file in your repository.
- A README file typically includes information about the project, how to get started, and any other relevant details.
- Including a .gitignore file is useful for specifying which files or directories should be ignored by Git (e.g., build artifacts, temporary files).
- Choose a License:
- Selecting a license defines how others can use, modify, and distribute your project.
- It’s a legal statement that helps protect your work and clarifies how others can interact with it.
- Common licenses include MIT, GPL, Apache, and more. GitHub provides a license picker to help you choose the right one for your project.
In this field, the only field that is mandatory is the Repository name. Give a unique name and proceed to create the repository by clicking on the “create repository” button. This method of creating a repository provides a set of commands to push your project online.
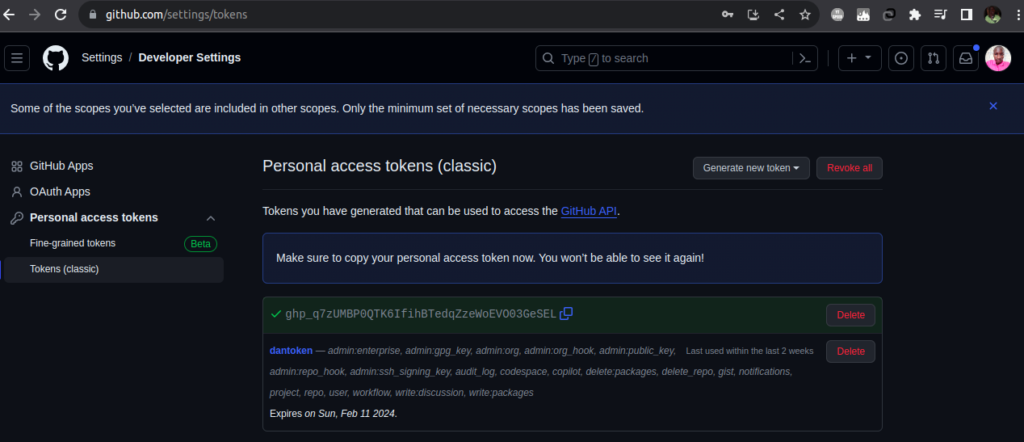
2. Create an authorization token
GitHub has recently changed the process for pushing projects. As a result, it is now necessary to generate personal access tokens before pushing any projects to GitHub. This change was implemented with the goal of enhancing security. See below how to create a personal token.
- In your GitHub account, Click on your profile picture in the top right corner of GitHub and select settings.
- In the left sidebar, click on “Developer settings.” and Select “Personal access tokens.”
- Click the “Generate token” button >> “Generate new token (classic)“.
- Give your token a name and, most importantly, select the scopes (permissions) your token needs. For pushing repositories, the repo scope is usually required.

Once you create the token, copy it immediately. The token will not be revealed again once you leave the page. In such a case that you fail to copy, you can always create a new one.
For reference, also check: official GitHub documentation
3. Push the Project to your GitHub repository
To push your project, navigate to the location on which you created the project on your PC, and launch the terminal or command prompt in that folder. confirm if you have the following.
- GitHub username. In this example, we use danielnjama
- Auth token. In this example: 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
- Name of your repository, as created in step 1. In this example gith-web
With the above information in place, run the following commands:
echo "# gith-web" >> README.md
git init
git add .
git commit -m "first commit"
git branch -M master
git remote add origin https://danielnjama:[email protected]/danielnjama/gith-web.git   #replace the information given here by your personal info
git push -u origin master
See the description of the commands used above.
echo "# gith-web" >> README.md:- Creates a new file named
README.mdwith the content “# gith-web” and appends it to the file. - The
README.mdfile is often used to provide information about the project.
- Creates a new file named
git init:- Initializes a new Git repository in the current directory.
- This command sets up the basic structure and metadata required for version control.
git add .:- Stages all changes in the working directory for the next commit.
- The dot (
.) is a wildcard that includes all files and directories.
git commit -m "first commit":- Commits the staged changes to the local Git repository with a commit message.
- The commit message “first commit” is a convention often used for the initial commit of a project.
git branch -M master:- Renames the default branch to “master.”
- This is a common practice, especially when initializing a new repository.
git remote add origin https://danielnjama:[email protected]/danielnjama/gith-web.git:- Sets up a remote named “origin” that points to the specified GitHub repository.
- The URL contains your GitHub username and a personal access token for authentication.
git push -u origin master:- Pushes the committed changes from the local “master” branch to the remote repository on GitHub.
- The
-uflag is used to set up tracking between the local and remote branches.
The above will push your projects to the GitHub repository.
4. Adding and Committing new Changes
When making new changes locally and needing to push them to your repository, follow these steps:
git add .
git commit -m "Your commit message"
git push origin master
For reference:
Make a donation to support us
Web Hosting and email hosting Packages
Related articles:
- A Practical Tutorial for Dockerizing Software Applications
- How to Configure a Docker App to a Domain Name
- Getting Started with Docker | Docker commands
- How To Run Scripts in Linux
- Deploy a Django Application on EC2 Instance with Nginx
- How to configure a domain to a docker container and install an SSL certificate on AWS